Showing posts with label Our Studio. Show all posts

Wednesday, June 3, 2009

Postage Stamp Basket : Quilting

In one of my previous posts I had mentioned how I started on a rather ambitious project right after a weekend class on Quilting. This is how it turned out.


A short recap.. In 2004 fall, I had taken this weekend class on Quilting to make a gift for a dear friend. In the class , the instructor taught us how to make a crib-size quilt , and the basic techniques of measuring , cutting the fabric, piecing (i.e. joining the bits of fabric together to make a fabric-"block") , quilting stitches ( i.e. stitches that hold together the 3 layers of a quilt- the top layer of fabric, the cotton batting in between, and the bottom layer of fabric), and finally binding ( i.e. finishing the edges after the layers are stitched together) .

I cant tell you how liberating an experience it was. I was always so envious of Joe, for being so passionate about the things he liked to do : cars, drawing, designing , reading and his list goes on ... and for me I could never figure out that "one thing" which would grip my heart 'n soul...but finally it looked like quilting was that evasive "answer" I was looking for!

At the time one of the fabric stores in our neighborhood was having a Christmas Sale and we decided to take a look. We got back home with pieces of at-least 25 different designs. The next thing that followed was a book called "Quilts! Quilts !! Quilts !!!"- by Diana McClun . For the next few days we made countless trips to the nearby craft-store for other supplies and gadgets and of course....for more fabric. The season also got me one of the best surprises ever, a sewing machine - a very thoughtful gift from my husband .

My inspiration was the Postage Stamp Basket quilt in Ms.McClun's book. The block- construction looked fairly simple and though the possible design layouts were endless , I decided to stick to the basic layout and color scheme from the book (though we had to change the scale).

Below: Joe made this image on MS Word , scaling it down to the size that we had wanted at the time. This was the starting point.

All those specks of color on the white background looked so cheerful and I was sure it would make the perfect accessory to brighten up any room, any day. The blocks were laid out in such a manner that 'same color patches' made a diagonal line, creating a lot of visual interest. It might sound like I was on an easy course , since I had decided to follow the layout and color instructions from the book, but getting the different patches of fabric to create that diagonal-line was tough. I had to get just the right shade of yellow or red, otherwise it would stick out and completely wreck the picture I had in mind.

By the first week of January 2005 I had started working on it , averaging an hour a day. I remember the instructor in my class saying that she preferred to do at-least some part of the process by hand (like the quilting stitches , or the binding ) rather than by machine .. that's what adds the personal touch. I particularly enjoyed the "stitching by hand" part and decided to use the sewing-machine only for piecing and to do the quilting and binding by hand.

It took me a long 6 months to get it to what you are seeing now, "almost finished" ( well, it is still not complete according to my original plan.. nevertheless by finished, I mean , usable and presentable) and it made the perfect gift for Joe on his birthday that year ! He was thrilled.


In case I have managed to pique your interest in quilts by now , here is some more information and specs on it. The finished quilt measures 82" X 96 " . There are 120 finished blocks on it and each block is finished with 8 pieces of fabric ( 2 squares, 3 big half-square triangles, 2 small half-square triangles and the handle applique ) . A finished block measures 6"X6". Here is a close-up of one of the blocks (below). You can also see the quilting stitches on the white background fabric.


Happy Quilts to you all !!
~ Aswathy

Saturday, May 9, 2009

Houses on a Row : Back to Quilting (1)

Happy Mothers Day to all Mommas out there !!

This year I am treating myself on Mothers' Day and picking back up on a passion that I had left behind for a while now. 


"Before Prozac , there was Quilting"-Anon.

I cant agree more !! I dont know what Prozac can do for you..but I do know that Quilting can be quite therapeutic and much more !

I started quilting about 5 years back. My dearest friend was going to have a baby in the fall of 2004 and I wanted to gift her with something extra-special. And the best thing I could think of was a handmade quilt. Thinking back, I feel I might have been a little over-confident at the time ;I had very limited knowledge of needlework .. my proudest achievement till then was a cross-stitch I had made for Joe and that had taken me some 3 months to complete. So here I was, with no sewing machine, not even a proper scissor to cut fabric, but just enough enthusiasm to make that "extra-special" gift!

I enrolled for weekend class at one of the local quilting-supplies shop. In the two days I got an overload of information on the "gadgets" needed,how to choose a design, how to pick fabric to make that design successful, the layers that make the quilt, and even how to use a sewing machine .... and also at the end of the weekend each of us in the class had one unique crib-size quilt ready!

I was brimming with enthusiasm the following days . Got myself couple of books from eBay and was determined to learn more. As I flipped though the pages , I was amazed to get a feel of the passion poured into the quilting process by the quilters. I soon discovered that quilters in the US share a sisterhood.

That same year Joe got me just the perfect Christmas gift, a quilting/sewing machine ...and right after New Years I started on my next big project, a queen size quilt. Over the years I have come to like hand-piecing ( joining the bits of fabric by hand ) and hand-quilting ( doing the quilting stitches by hand) rather than by machine.

After quite a long break, I am going start quilting again. This time to pick up on an unfinished project that I started 3 years ago.It was the picture of a row of houses in a magazine I saw at that time, that inspired me to design this quilt (picture below). I made the image below in MS word, just to give me a overall picture of the color composition and the yardage ( fabric needed).. so please forgive the imperfections ( you can see that some of the blocks and borders are out of place).

After I started the project 3 years back, I got distracted with some smaller projects and a cross-stitch ...and of course , my in-house tornado of a toddler! So here I what I have done so far :

The 6 finished blocks ( another 36 to go ). Though I started off with all hand-piecing..I don't think it is going to be practical given the size of the project..hence planning to switch back to the machine now.

Here is what one finished house (block) looks like . Each finished square is made up of 17 smaller bits of fabric. The block shown below is one of hand-pieced ones ( all the bits of fabric are joined by hand).

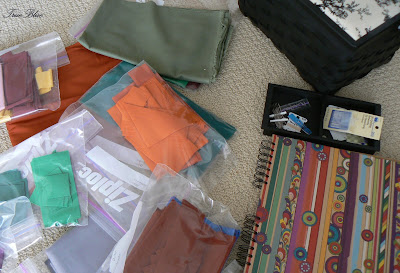
Here is the stash.. all the fabric that I intend to use in this quilt. I have already cut the fabric for the house-blocks and segregated them in individual bags (lest the little-tornado would swipe away anything out in the open and in plain sight ). I am yet to cut the green , grey and red fabrics for the borders.
The finished quilt would be almost Queen/Full size ( 82" x 92") with 42 house-blocks and adjoining borders.

I hope to get working on this tomorrow itself. Will post updates in a month. :)

Monday, March 23, 2009

A crazy bowl , a bejewelled bird ..and 30 bottles of paint in a shoebox

Recently I was reading this post from Once Upon a Tea Time and took an instant flight down memory lane...
Joe is known to be the creative guy in the family .. and me, I could hardly draw a straight-line. I had never tried my hand on any arts or crafts till my marriage..and just went on with my notion that "it-is-not-my-thing". However, after we got married and I got here..we were on the lookout for new apartments to rent . After seeing any apartment ( most of them would be empty at the time), Joe would come back home and make me a sketch on how each room would be like , once we furnished it . I was so impressed by his artistry.. also feeling a tad disappointed that I couldn't impress him with anything of that sort.

Around this time we got a flier about the various classes offered by the city.. and ever-so-enthusiastically I enrolled myself for a class on "Ceramic Painting". Being the,sweetest guy that he can be, Joe wanted to go with me for the class an we ended up taking the class together. While the rest of us were trying to negotiate the basic techniques of painting bamboo shoots or flowers, Joe was busy trying to impress the teacher with his "brush-less painting"( he would just put a blob of paint on the tile and then jut keep tilting it till it made a design). Unfortunately I don't have any pictures of those ..I would have loved to share it here.
Anyway.. the end of the story is that.. I finally learned a craft. I was so thrilled .. I was painting on everything i could lay my hands on.. tiles, cups, plates any glazed surface at home was subject to my artistic explorations :)
This is a a crazy-bowl I painted.It was a little bit more difficult than I had imagined because of the curved surface; you can see that some of the paint has puddled in the center.

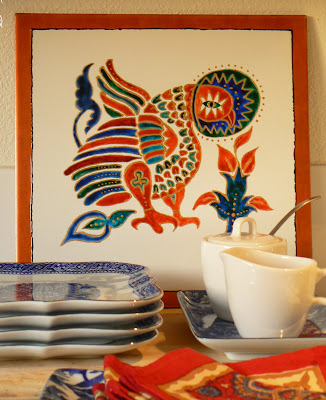
Below, is one of our better creations. It is the depiction of a Byzantine bird on a 12"X12" floor tile. It took almost an entire day for both of us to do this ..from making the stencil to adding the multiple layers of paint. The copper tones border is actually layers and layers of thinned down paint applied and dried using a hair-dryer to get the smooth eggshell effect.The inspiration picture is from one of the tile decorating books. We are yet to figure out a way to showcase this .. if you have any suggestions please feel free to comment.

A little bit on the paint used: We have used Pebeo 150 , a non-toxic water-based paint for all the ceramic and glass painting. After the paint is dried, you just set it in the oven for 30 min in 300F and the artwork stays permanent on the surface.

Friday, February 20, 2009

Random Clicks

These are some snaps from our everyday life , random objects at home...putting the camera to some use :) Nothing in particular...

Our Tewa Horse from Trail of Painted Ponies. When we got him, we were all set to start a collection. Then Blu came along and needless to say.. everything else took a backseat. Hope to get a few more ponies from the fabulous collection in future.

A brass candle-holder with Andalusian(Moorish) cutouts. It's really nice to see the flame glowing at night, so I hope to have another posting on this sometime in future. Surprisingly, we didnt have to make a trip to the exotic Casablanca to get this one- its from a favorite local store-Target!

An impromptu table-scape (above). The branch above fell off from one of the plants in our tiny garden.. the flowers looked so fragile, we felt like saving them in a rescued Starbucks Cappuccino glass bottle. Some things in the background include our distressed black farm-style table, and a graceful platter from one of our trips to Filoli (we will have a post on Filoli soon).

Can u tell if these succulents are real? Honestly, neither can we, even from close quarters! Some of the real cactii in our garden outside, pale in comparision with these, and the only way to make out is to pinch a leaf. :-) These are miniatures and add a lot of life to wherever we keep them. They have so far adorned the kitchen and the guest bathroom. The picture above is the foursome collection sitting on the kitchen window sill.

Above: Clicking away on a lazy day- The Reclaimers- a guide to salvaging hardware- everything from really rusty tubs to screws and kitchen hardware sits on a game set called "Stretch Run", an equestrian board game which we are yet to figure out how to play.

A lonely kenyan soapstone thinker flanked by two wine bottles and other trivia on our mantle. The Walt Disney Treasury of classics is over 30 years old, and from Joe's childhood- a gift that his Papa gave and treasured to this day.

This one is from our studio! I painted a plain old white Ikea bowl into this as a gift for Joe many years ago. There werent much rules, and the basic idea was to just play around with all four basic colors- Red, Blue, Green and Yellow- in some shade or form. This one is reminiscent of our days together after we got married and took some ceramic painting classes together. It was such fun! The paint is Pebio ceramic paint, which is believed to be one of the better quality ones- and non-toxic. After painting, the dish was baked in an oven to "set" the paint in, so that it cannot be washed away. Ceramic painting is a really fun hobby to have, and we are hoping to catch up on it again.

Friday, February 13, 2009

Blu... My Little Valentine


Happy Valentines Day everyone!

Blu celebrated his Valentines' at school yesterday. There are 12 other little-hearts in his class and it was such a joy to see them go around with their Valentine-bags ( that was hist last week's project at school; Teacher J. had cut out some lovely red and pink hearts and the kids were to stick them on a plain white paper bag. Yesterday the finished product arrived as we walked in, with a very pretty red polka-dot bow on it ). Here are the cards we made for his class (pic above )

We ( me & Blu) also had a secret project going on, on the side. Now that we got the hang of cutting and trimming , we decided to make another card for Joe while waiting fo him to come back from work. Those are the outlines of our palms cut out and stuck to card-stock (pic below). Blu was absolutely thrilled when I told him that he could blow the glitter-heart to Papa as soon he opens the door.